
Blog by Stanley Sequeira | Oct 13, 2015

In my previous posts we either uploaded Data in JSON format or used a CSV file. In this post, I’ll explain you how to utilize your Salesforce Native Data into the Wave Analytics Cloud.
It’s one of those use cases which most enterprises might want to explore to the fullest.
Step 1: Let’s login into our WAVE App
Step 2: Click Create -> Dataset

Step 3: Select Data Source as Salesforce

You’ll see a list of all objects (Standard and Custom) that are accessible via the REST API.For this use case we’ll extract Opportunity, User and Account Information.
Between Opportunity, User and Account; the lowest grain is Opportunity information.
Step 4: Search for Opportunity and select it

You’ll see that Opportunity has now been selected as a ROOT for this dataset

Step 5: Hover on the Opportunity, you’ll see a + symbol appearing right next to it displaying the Opportunity fields and relationships.
Select the following fields
- Amount (Currency)
- Close Date (Date)
- Closed (Boolean)
- Description (Text Area)
- Lead Source (Picklist)
- Name (String)
- Opportunity Type (Picklist)
- Region (String)
- Stage (Picklist)

Step 6: If you click on Relationships, you’ll see all the objects Opportunity is related too.

Step 7: We’ll Join Account Id now and add additional Account attributes like –
- Account Name (String)
- Account Phone (Phone)
- Account Type (Picklist)
- Account Description (Text Area)

Step 8: We’ll go back to the Opportunity and add the Owner Information, by Clicking JOIN OwnerID. We’ll select some attributes on Owner like
- About Me (TextArea)
- Company Name (String)
- First Name (String)
- Full Name (String)
- Last Name (String)

You can look at the JSON of the schema by clicking on </> on the top left

Step 9: Click Create Dataset placed on the top right of the screen. Enter the Dataset Name

You’ll get a Message and Click Yes

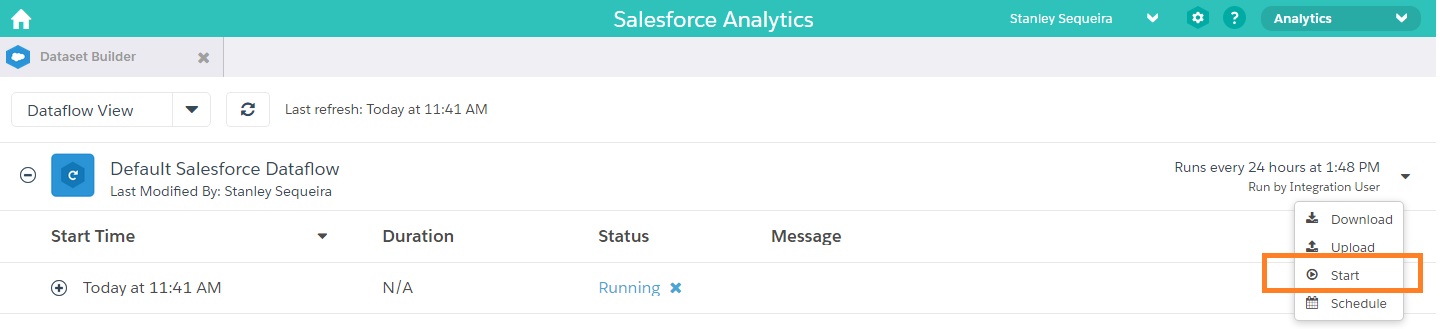
Step 10: Select the Dataflow View. If the Job hasn’t started, drop down on the User (Right section of the screen) and Click Start
You’ll see the process running. Give it a couple of minutes and you’ll see a success message.

Step 11: If you expand the job, you can actually see how many rows were processed per object.

Step 12: Alternatively you can always schedule this job to Run every 24 hours.Click on the Running User (Same menu where you clicked on Start in Step 10) Schedule and set a time.

Step 13: Now if you click on Home -> Datasets, you’ll see the dataset we just created.

Step 14: Now if you see the grouping attributes, it contains the same set of fields we selected on Account, Opportunity and User objects

With this use case and setup on WAVE, we can have Analytics run on our Salesforce Data which more or less is more dynamic moving data as compared to uploading a CSV or JSON Data.

Good Post .. knew that wave could use salesforce data but didnt know how to do it. thanks for the post
LikeLiked by 1 person